

Choose by Control Type: Solar Attic Fan Thermostats for Florida Homeowners
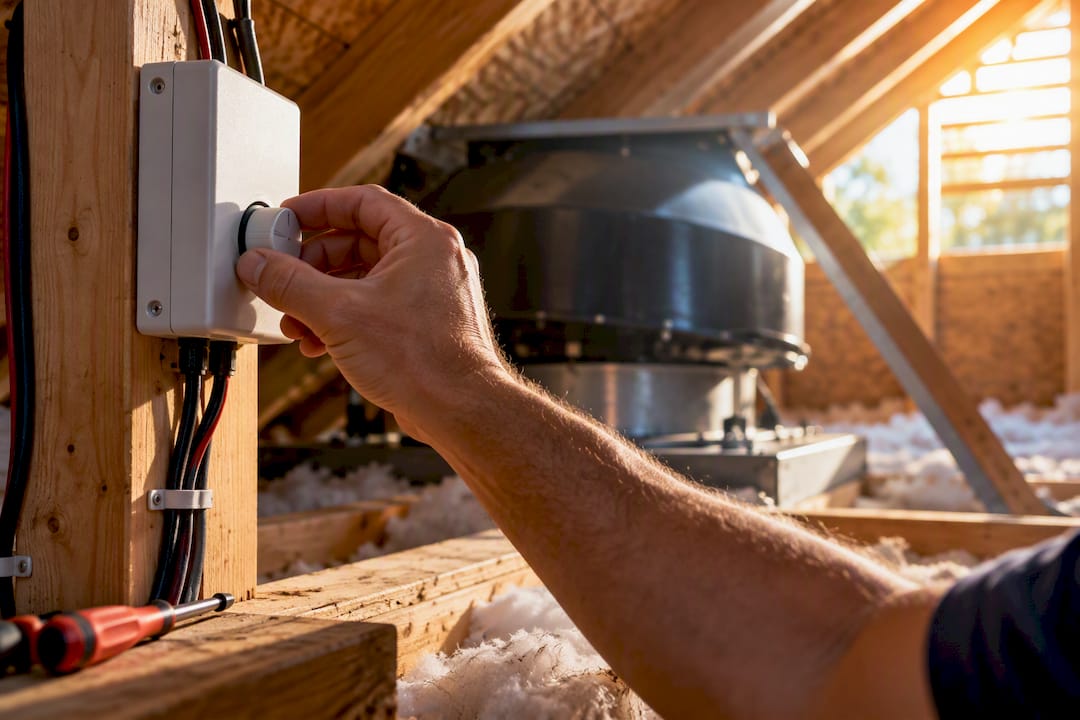
Yes, most solar attic fans on the market today include a built-in thermostat, and many add a humidistat too. Before you buy, confirm whether your unit has factory controls or needs an add-on controller, check if it offers hybrid (110V) night operation, and match its CFM rating to your attic’s square footage.
TL;DR:
Most solar attic fans include a built-in thermostat, with higher-end units often adding a humidistat for better moisture control in humid climates.
Electronic thermostats with adjustable setpoints and hysteresis gaps are now standard, reducing short cycling and prolonging fan lifespan.
Hybrid (110V) adapters and smart Wi-Fi controllers provide extended runtime after sunset, but their benefit depends heavily on your attic’s heat retention and climate.
Proper sizing relies on matching CFM to attic square footage and ensuring sufficient intake venting; larger or multiple units improve cross-ventilation for bigger spaces.
Regular maintenance such as cleaning panels, inspecting screens, and verifying sensor accuracy ensures reliable performance and prevents common operational issues.
Table of Contents
How Do Thermostats and Humidistats Control a Solar Attic Fan?
A solar attic fan thermostat works like the one in your car or your home HVAC system, just simpler. A sensor reads the air temperature inside the attic and closes a switch once it crosses a set point, sending power from the solar panel to the fan motor. Some models pair that thermostat with a humidistat, a second sensor that tracks relative humidity and turns the fan on independently of temperature.
Two different technologies handle this switching, and the difference matters more than most buyers realize.
Mechanical thermal switches use a bimetallic strip that physically bends as it heats up, closing a circuit at a preset temperature. They’re simple, cheap to manufacture, and rarely fail outright, but they drift over time and can’t be fine-tuned. Electronic thermostats use a solid-state sensor and a small circuit board, which lets manufacturers build in adjustable setpoints, digital displays, and combined humidistat logic. Most premium solar attic fan controllers sold today use the electronic route because it allows the hysteresis gap (the difference between the “on” and “off” temperatures) to be tuned precisely.
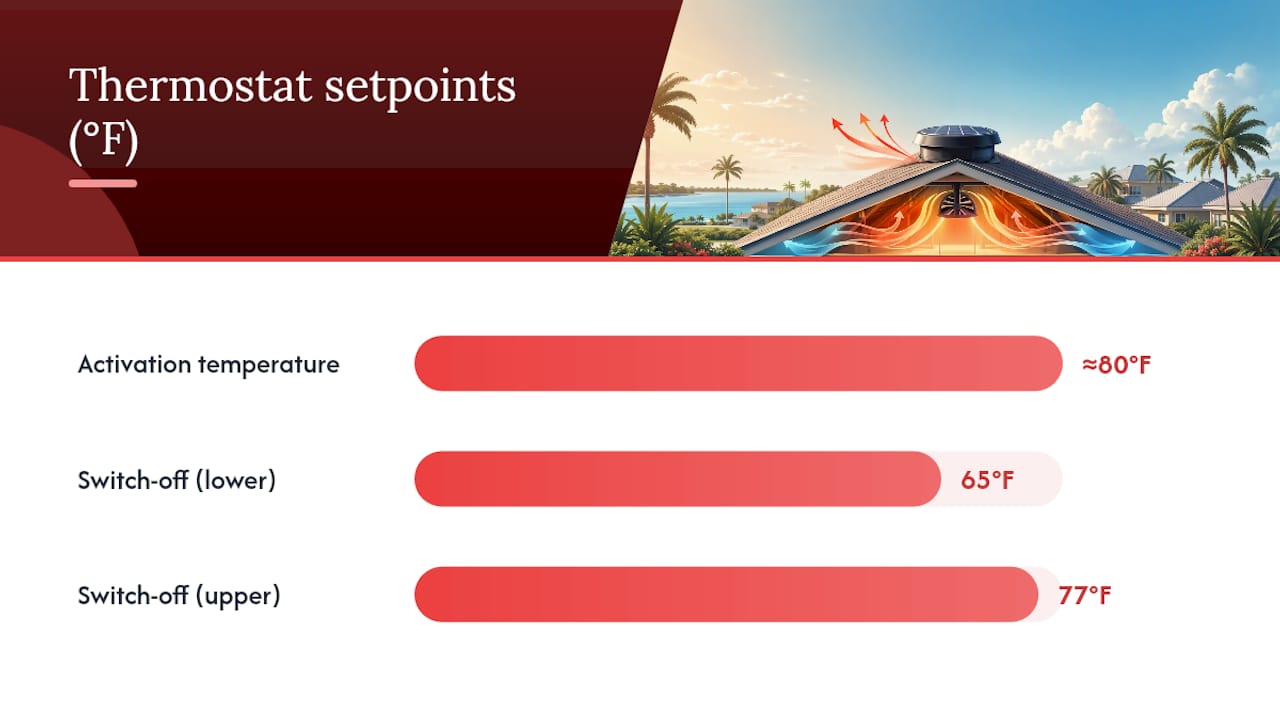
That hysteresis gap is the part homeowners overlook. Manufacturer specs from Remington Solar show a typical fan activating at around 80°F and switching off in the 65 to 77°F range depending on model, rather than shutting off the instant it dips below the activation point. That gap prevents the motor from clicking on and off every few minutes on a partly cloudy day, which would wear out bearings fast.
Here’s what to expect from the control hardware on a modern unit:
Built-in thermostat: standard on nearly every solar attic fan sold today, factory-set but sometimes adjustable via a dial or app.
Humidistat add-on: increasingly common on 40W and larger units, especially those marketed for humid climates.
Controller box with display: shows current attic temperature and humidity, and lets you override the fan manually.
RF remote pairing: lets you adjust setpoints from inside the house without climbing into the attic.
Humidistats earn their keep in hot, humid climates where moisture drives attic damage as much as heat does. A fan that only responds to temperature might stay dormant on a cool, rainy, 90% humidity day, the exact conditions that promote mold on roof sheathing. A combined thermostat and humidistat closes that gap by triggering ventilation on moisture readings alone, independent of temperature.
Factory presets work fine for most homes, but adjustable setpoints give you room to correct for a poorly ventilated attic or a metal roof that runs hotter than asphalt shingles. If your controller allows it, nudging the “on” threshold down a few degrees during peak summer months can meaningfully cut how long heat lingers before the fan engages.
Hybrid Adapters and Smart Controllers: Running Your Fan After Dark
A solar panel stops producing power the moment the sun goes down, but attics stay hot well past sunset thanks to stored heat in roofing materials. That’s the gap hybrid adapters and smart controllers are built to close.
Hybrid (110V) adapters automatically detect when solar output drops and switch the fan to household AC power, letting it keep running on a thermostat-driven schedule after dark. Most hybrid-ready units, including several from Remington Solar, handle this switch without any input from you.
Run-at-night switches take a different approach, running the fan for a preset number of hours after dusk regardless of temperature to pre-cool the attic for the next day. Solatube’s ClimaSense controller automatically shifts to house power at dusk and runs on a fixed cycle, so the attic starts each morning cooler than it would otherwise.
Smart Wi-Fi controllers add scheduling, remote monitoring, and humidity-aware logic you can check from a phone app. High-output units like the QuietCool AFG SMT PRO-2.0 pair a two-speed motor with thermostat and humidistat control and app-based adjustment, rated up to 1,945 CFM.
Each option trades cost and complexity for capability. A basic hybrid adapter adds modest cost over a solar-only fan and needs a nearby outlet or a licensed electrician to wire in, but it delivers 24-hour coverage during heat waves. A run-at-night switch is simpler and cheaper than a full smart system, though you give up fine control over exact runtime. A Wi-Fi controller costs more and depends on a stable home network, but it’s the only option that lets you check attic conditions remotely or adjust settings without a ladder.
For most Florida homes, where summer nights rarely drop attic temperatures much below daytime highs, hybrid capability earns its keep. A fan that only runs when the sun is out leaves eight or nine of the hottest hours uncovered every single night in July and August.
What Temperature and Humidity Setpoints Actually Work?
Factory defaults exist for a reason, but they’re calibrated for an average home in an average climate, and your attic is probably not average. Manufacturer documentation from U.S. Sunlight’s controller manual lists a typical activation point near 80°F with shutoff around 77°F, alongside humidity thresholds that trigger independent of temperature.
Pro Tip: If your controller lets you adjust the “off” setpoint, don’t set it too close to the “on” point. A gap smaller than 5 degrees causes short cycling, which is the single fastest way to burn out a fan motor.
Manufacturer specs commonly set humidistat activation at around 75% relative humidity, a threshold chosen because sustained readings above that level are where mold growth and wood rot accelerate on roof sheathing.
Setpoints should shift with your climate, not stay locked on the factory number:
Hot, humid regions: keep the humidistat active year round and consider lowering the “on” temperature to 75 to 78°F during peak summer.
Hot, dry regions: temperature control matters more than humidity; the factory 80°F default usually works without adjustment.
Mixed climates: leave both sensors active, but expect the fan to run far less in spring and fall than in July.
Storage-only attics: a slightly higher “on” threshold (82 to 85°F) reduces run time and motor wear without meaningfully raising heat buildup.
Winter needs a different mindset entirely. Running a humidistat through a cold, damp winter can trigger constant cycling from condensation rather than summer-style humidity, so many installers recommend disabling humidity-only control once temperatures drop consistently below 50°F. Freeze damage to motor bearings is rare but not unheard of in unheated attics that see hard freezes, so check your model’s cold-weather rating before assuming it runs safely all year.
How Do You Size a Solar Attic Fan for Your Attic?
Sizing starts with square footage, not with the fan you happen to like the look of. The widely used rule of thumb calls for roughly 1 CFM of airflow per square foot of attic floor space, though steep roof pitches, dark shingles, and poor insulation all push that number higher.
A few worked examples make the math concrete:
1,200 sq ft attic: needs roughly 1,200 CFM total, achievable with one large unit or two mid-size fans working together.
1,800 sq ft attic: typically calls for two units, or a single high-output fan like the Master Flow ERV4, rated at 1,000 CFM with 480 square inches of net free ventilating area.
2,500+ sq ft attic: usually needs multiple fans distributed across the roofline rather than one oversized unit straining to move air across the whole space.
CFM ratings only mean something if your attic has enough intake venting to feed the fan. Net free ventilating area (NFVA), the actual open square inches available for air to enter through soffit or gable vents, has to keep pace with what the fan pulls out. A fan rated for 1,000 CFM starves for intake air if your soffit vents are painted shut or blocked with insulation, and it’ll run constantly without ever cooling the attic the way its spec sheet promises.
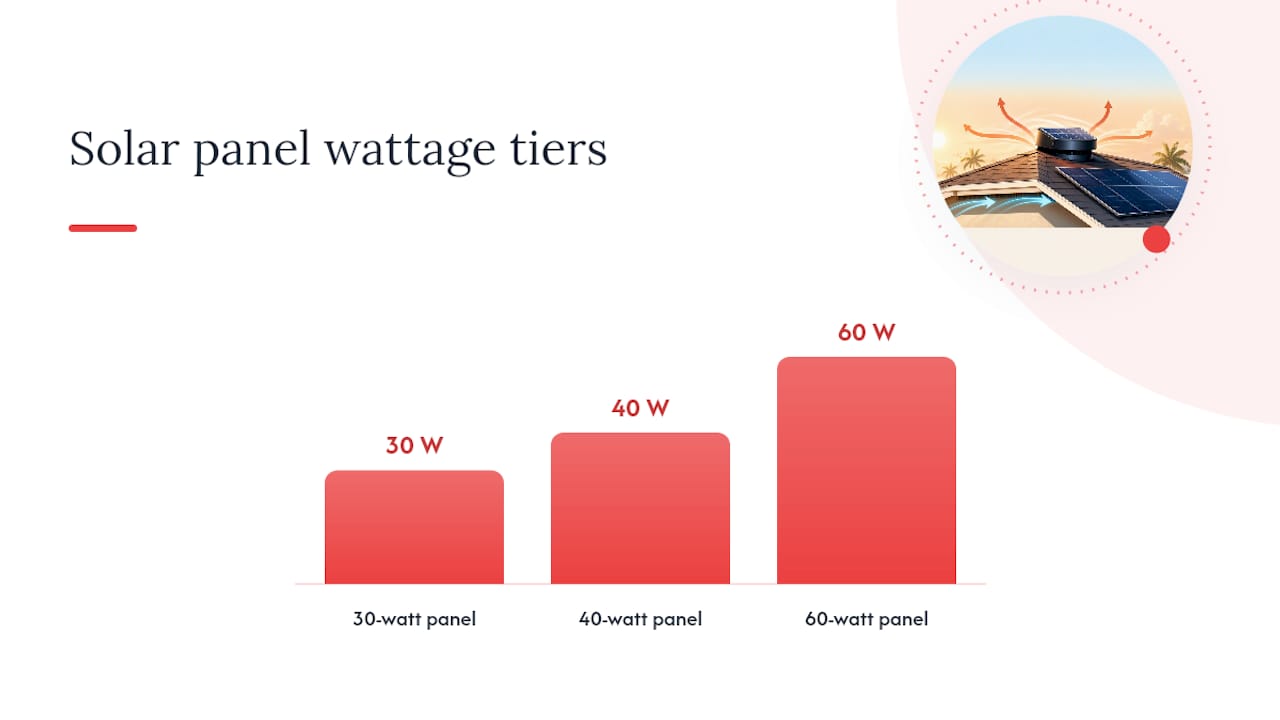
Solar panel wattage shapes how much of that rated CFM you actually get on a cloudy day. A 30-watt panel runs a smaller motor at full output only in strong direct sun; a 40-watt panel gives more margin on hazy days; a 60-watt panel, paired with a larger motor, sustains higher CFM through more of the day and recovers faster after cloud cover passes. If your roof gets partial shade for part of the afternoon, stepping up to a 60-watt panel is often the better fix rather than buying a fan rated for more CFM than your intake venting can support anyway.
For very large or oddly shaped attics, two smaller units placed on opposite ends of the roofline usually outperform one giant fan, since they create better cross-ventilation instead of just pulling air from the nearest vent. Hybrid power tips that decision further: if you’re already wiring in a 110V adapter for one unit, running two hybrid-capable fans off the same circuit is often simpler than sourcing one oversized model. Our guide to solar attic fans and cooler Florida homes covers how this plays out across different roof types.
What Does Installing a Thermostat-Controlled Attic Fan Involve?
Placement decides more about performance than most homeowners expect going in, and it’s worth thinking through before a single screw goes into the roof deck.
Choose roof mount or gable mount. Roof mounts sit closer to where hot air actually collects at the ridge and generally deliver better airflow, but they need proper flashing to avoid leaks. Gable mounts skip roof penetration entirely, which makes them the lower-risk choice on tile or slate roofs where matching flashing is difficult.
Match the flashing and shroud to your roofing material. Asphalt shingles, metal panels, and tile all need different flashing profiles; using the wrong one is the single most common cause of attic fan leaks reported by roofers.
Position the controller or remote sensor away from direct sun and away from the fan’s own motor heat. A sensor mounted too close to the unit reads artificially high and triggers early, throwing off your carefully chosen setpoints.
Confirm RF pairing between the remote and controller before final installation, since resolving a pairing issue is far easier on the ground than after the fan is sealed into the roof.
Wire hybrid adapters to a dedicated circuit, not a shared outlet already carrying other attic equipment, to avoid nuisance tripping during peak summer runtime.
Pro Tip: Never wire a hybrid 110V adapter into an existing circuit yourself unless you’re a licensed electrician. Attic wiring runs through insulation and tight joist spaces where a mistake is both hard to spot and genuinely dangerous.
DIY installation works fine for straightforward gable-mount fans with pre-wired solar-only operation. Roof penetrations, hybrid AC wiring, and multi-unit setups are where hiring a licensed installer stops being optional and starts being the responsible call, both for warranty coverage and for basic electrical safety.
Are the Energy Savings and Tax Incentives Worth It?
A thermostat-controlled solar attic fan does three things reliably well: it lowers peak attic temperatures, reduces the moisture load that causes mold and wood rot, and takes some strain off your air conditioner during the hottest part of the day. None of that requires taking a manufacturer’s word for it; it follows directly from moving hot, humid air out of an enclosed space that would otherwise trap it against your ceiling insulation.
Attic temperature reduction: a well-sized fan running on an 80°F setpoint keeps peak attic temps meaningfully below what an unventilated attic reaches on the same afternoon.
Moisture control: humidistat-equipped units reduce the sustained high-humidity conditions that drive mold growth on sheathing and insulation.
A/C load relief: less heat radiating down through the ceiling means your air conditioner cycles less often during peak afternoon hours.
Extended roof life: lower sustained attic temperatures slow the breakdown of asphalt shingles from the underside, a factor roofers cite often but rarely quantify.
On incentives, the honest answer is that it depends on the equipment and how it’s installed. Some rooftop solar equipment qualifies for the federal 30% solar tax credit, but attic fans aren’t automatically covered the way a full PV system is. Whether your specific fan qualifies often hinges on how it’s wired and whether it’s part of a larger solar installation, so check current IRS guidance and confirm with your installer before assuming the credit applies to your purchase. Local utility rebates vary by provider and sometimes hinge on hybrid capability or minimum CFM ratings, so it’s worth a phone call before you buy rather than after.
Payback math is straightforward in concept: weigh equipment and installation cost against seasonal cooling savings plus the value of a longer-lasting roof. A single fan rarely pays for itself through electricity savings alone in the first year or two, but the moisture protection and roof life benefits extend the timeline in your favor well beyond that.
How Do You Maintain and Troubleshoot a Solar Attic Fan?
Most solar attic fan problems trace back to one of four things: a dirty panel, a blocked screen, a drifting thermostat, or a controller pairing issue. Catching them early is mostly a matter of a short seasonal checklist rather than any real expertise.
Clean the solar panel twice a year, since dust, pollen, and roof debris can cut output enough to delay activation on borderline days.
Inspect the intake screen for debris, nests, or insulation blocking airflow, especially after storms.
Listen for motor noise, particularly grinding or high-pitched whining, which usually signals bearing wear well before the motor fails outright.
Verify thermostat accuracy once a year with a separate attic thermometer, since mechanical switches especially can drift a few degrees over several seasons.
When a fan won’t run despite full sun, the thermostat itself is the most common culprit. Check whether the setpoint is set too high for current conditions before assuming the motor or panel has failed. A fan that runs but moves noticeably less air than it used to often has a partially blocked screen or a failing capacitor rather than a dead motor. Short cycling, where the fan clicks on and off every few minutes, almost always points to a hysteresis gap set too narrow or a sensor mounted somewhere it reads inaccurate temperatures.
Controller and remote issues tend to show up as RF pairing failures, where the display stops responding to remote adjustments, or as a fallback mode kicking in unexpectedly when the unit switches to house power. If your unit falls back to a fixed intermittent cycle instead of running its normal thermostat logic, that’s usually the controller signaling it’s lost communication with the sensor, not a sign the whole unit needs replacing.
Call a licensed electrician or your original installer when the issue involves AC wiring, a hybrid adapter that won’t switch over, or any sign of burning smell or scorched wiring near the controller box. Have your model number, the fan’s age, and a description of exactly when the problem started ready before you call. It saves a diagnostic visit from turning into a guessing game. For panel-specific upkeep, our solar panel maintenance guide walks through the cleaning schedule in more detail.
Ronnie’s Take: What Actually Matters When You Buy One
Most of the marketing around solar attic fans focuses on wattage and CFM numbers, and those matter, but they’re not where I’d spend my attention first. The control logic is what determines whether you get consistent performance or a fan that runs at the wrong times for years without anyone noticing.
An automatic thermostat paired with a humidistat is the setup I’d default to for nearly every home, especially anywhere summers run hot and humid. The extra sensor costs little relative to the whole unit and closes a real gap that temperature-only control leaves open on muggy, overcast days.
Hybrid or run-at-night operation is where I’d tell you to think harder about your actual climate and roof, not just buy it because it sounds better. If your attic already vents well and your evenings cool off fast, the extra wiring and cost may not earn its keep. If your nights stay hot and your attic holds heat like an oven until midnight, it’s a genuinely worthwhile upgrade.
Before you buy anything, get a proper site survey. Solar exposure, existing intake venting, and attic square footage all change the right answer, and no online sizing chart accounts for your specific roof.
— Ronnie
Get a Free Site Survey From Florida Solar East
Florida Solar East is the practical next step once you know what kind of thermostat-controlled attic fan your home actually needs. We install solar attic fans, including hybrid and controller-equipped setups, and our estimates are based on your real attic dimensions and roof exposure rather than a generic sizing chart.

Financing options and guidance on federal tax credit eligibility are often available to homeowners moving forward with installation, and installation teams can confirm what applies to specific projects before contracts are signed. If you’re weighing attic ventilation against other home efficiency upgrades, projects like new interior doors for older homes show how heat management adds up across a house, not just in the attic.
Schedule a free site survey with a solar installation company to get a tailored answer on sizing, hybrid options, and installation cost for your specific roof.
Sources
FAQ
Do Solar Attic Fans Have Thermostats?
Most solar attic fans sold today come with a built-in thermostat, and many higher-end models add a humidistat as well. Check the product specs before buying, since a small number of budget units still require an add-on controller for temperature-based operation.
Do Solar-Powered Attic Fans Actually Work?
Yes, a properly sized solar attic fan measurably lowers peak attic temperatures and reduces humidity buildup by exhausting hot, moist air. Performance depends heavily on matching CFM to your attic size and making sure intake venting can keep pace with the fan’s airflow.
Do Solar Attic Fans Qualify for Federal Tax Credits?
Some rooftop solar equipment qualifies for the federal 30% solar tax credit, but attic fans aren’t automatically covered the way a full photovoltaic system is. Check current IRS guidance and confirm eligibility with your installer before assuming your specific unit qualifies.
At What Temperature Should My Attic Fan Turn On?
Manufacturer defaults commonly set activation around 80°F, with shutoff in the 65 to 77°F range depending on the model. Hot, humid climates often benefit from lowering that threshold slightly during peak summer months if your controller allows adjustment.
How Do I Get a Solar Attic Fan Installed With Financing?
Florida Solar East provides free site surveys along with financing and federal tax credit guidance for solar attic fan installations. Pricing depends on unit size, hybrid features, and roof type, so request a quote through the site to get exact numbers for your home.
Recommended

Comments